coNnectUS User Guide
coNnectUS is a desktop Address Book application designed for NUS students to manage their contacts. It is optimized for use through a Command Line Interface (CLI) while retaining the benefits of a Graphical User Interface (GUI). If you type quickly, coNnectUS can help you manage contacts faster than traditional GUI applications.
Quick start
Ensure that Java
25or later is installed on your computer.
Mac users: Ensure you have the precise JDK version prescribed here.Download the latest
.jarfile from here.Copy the file to the folder you want to use as the home folder for your instance of coNnectUS.
Open a terminal,
cdto the folder containing the JAR file, and runjava -jar coNnectUS.jar.
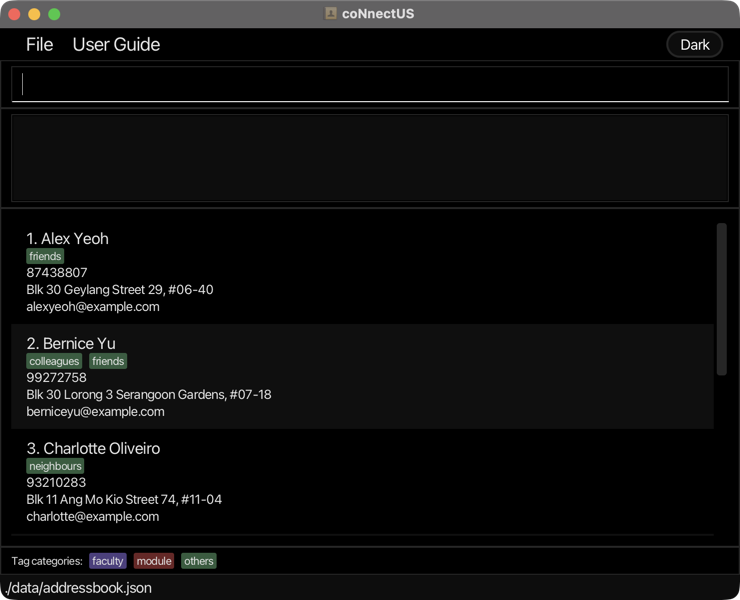
A GUI similar to the one below should appear in a few seconds. Note how the app contains some sample data.
Type a command in the command box and press Enter to execute it. For example, type
helpand press Enter to view the commands available.
Some example commands you can try:list: Lists all contacts.add -n John Doe -p 98765432 -e johnd@example.com -a John street, block 123, #01-01: Adds a contact namedJohn Doeto the Address Book.delete 3: Deletes the 3rd contact shown in the current list.clear: Deletes all contacts.exit: Exits the app.
Refer to the Features section below for details of each command.
Features
Notes about the command format:
Words in
UPPER_CASEare the parameters to be supplied by the user.
For example, inadd -n NAME, replaceNAMEwith a value such asJohn Doe.Items in square brackets are optional.
For example,-n NAME [-t CATEGORY TAG]can be used as-n John Doe -t others friendor as-n John Doe.Items followed by
...can appear zero or more times.
For example,[-t CATEGORY TAG]...may be omitted, or written as-t others friendor-t others friend -t others family.Prefixed Parameters can be in any order.
For example, for the add command,-n NAME -p PHONE_NUMBERand-p PHONE_NUMBER -n NAMEare both accepted.Parameters that are not prefixed must be specified in the order stated in Command Summary.
For example,sort name ascis accepted whilesort asc nameis not.Extraneous parameters for commands that take no parameters, such as
help,list,exit, andclear, are ignored.
For example,help 123is interpreted ashelp.With the exception of tags, repeated parameters in a command will result in the command being rejected.
For example,add -n Bob -n Alice -e Alice@gmail.com -p 91234567will be rejected as-nis specified twice.If you are using a PDF version of this document, be careful when copying and pasting commands that span multiple lines as space characters surrounding line-breaks may be omitted when copied over to the application.
Notes about accepted values for a contact's properties:
| Property | Accepted Values | Accepted Length and Format (if any) |
|---|---|---|
| Name | English Letters (A-Z, a-z) and spaces only | Must contain 1-70 characters and must not start with a space. |
Alphabets, Digits and some special characters: @, ., +, _ and -. | Must follow local-part@domain and contain at most 254 characters.
| |
| Phone | Digits only. | Must contain 3-15 digits. |
| Address | All characters are permitted. | Must contain 1-105 characters and must not start with a space. |
| Tag | English Letters (A-Z, a-z), digits (0-9), spaces, and apostrophes only. | Must contain 1-30 characters and must not start with a space. |
Getting help: help
Displays a command reference in coNnectUS's result display area, including command formats, descriptions, examples where applicable, as well as a link to this User Guide.
- Scroll through the results area to view the built-in commands available for use.
Format: help
Sample Output (truncated):
Help Menu
========
help
    Displays this help menu.

add -n NAME -p PHONE_NUMBER -e EMAIL [-a ADDRESS] [-t TAG_CATEGORY TAG_NAME]...
    Adds a contact to the address book.
    Example: add -n John Doe -p 98765432 -e johnd@example.com -a 311, Clementi Ave 2, #02-25 -t others friends -t others owesMoney

list
    Displays all saved contacts.


... more commands ...
Alternative way getting help: the User Guide
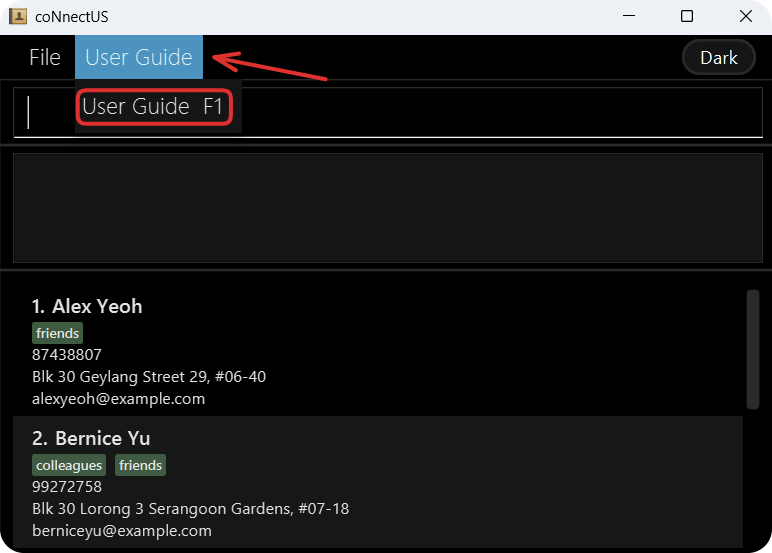
An alternative to accessing this user guide is through the "User Guide" dialog, using the following steps:
- With coNnectUS already open, click on User Guide on the top ribbon and select the button to trigger the User Guide dialog. Alternatively, you can press F1 on your keyboard.
- Once the dialog appears, click on the Open User Guide button to open this User Guide with your configured default browser.
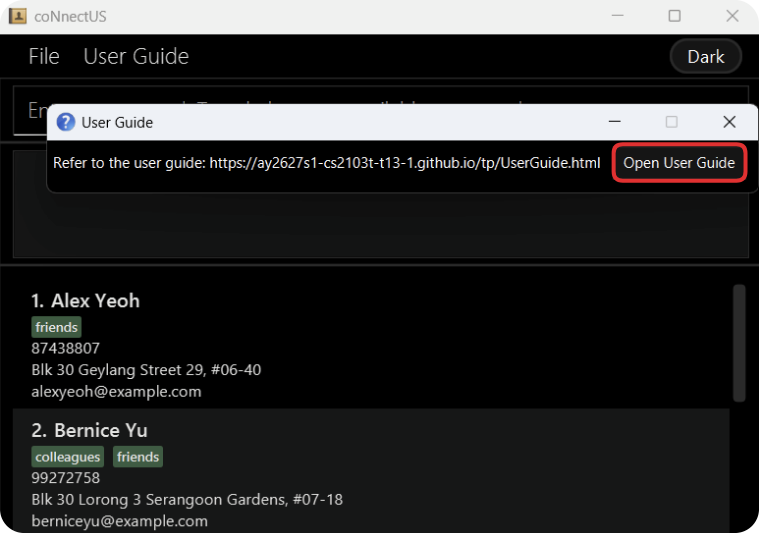
Note that if there are issues with your default browser, you would be prompted to click Copy URL instead and open it in a browser of your choosing.
Adding a contact: add
Adds a contact to the address book.
Format: add -n NAME -p PHONE_NUMBER -e EMAIL [-a ADDRESS] [-t TAG_CATEGORY TAG_NAME]...
Tips
- A contact can only have a maximum of
5unique tags. - Refer to Tagging a contact for more information on tags.
- The address parameter is optional.
- Each contact must have a phone number and email address that no other contact uses. Names do not need to be unique.
Examples:
add -n John Doe -p 98765432 -e johnd@example.com -a John street, block 123, #01-01add -n Betsy Crowe -t others friend -e betsycrowe@example.com -a Newgate Prison -p 1234567 -t others criminaladd -n Jane Tan -p 87654321 -e janetan@example.com
Listing all contacts: list
Shows a list of all contacts in the address book.
Format: list
Editing a contact: edit
Edits an existing contact in the address book.
Format: edit INDEX [-n NAME] [-p PHONE_NUMBER] [-e EMAIL] [-a ADDRESS] [-t TAG_CATEGORY TAG_NAME]...
- Edits the contact at the specified
INDEX. The index refers to the index number shown in the displayed contact list. The index must be a positive integer 1, 2, 3, ... - At least one of the optional fields must be provided.
- Existing values will be updated to the input values.
- The new phone number or email address must not already be used by another contact.
- When editing tags, all of the contact's existing tags are removed; adding tags is not cumulative.
- To remove all of a contact's tags, enter
-twithout a tag after it. - To remove a contact's address, enter
-awithout an address after it. - Refer to Tagging a contact for more info on tags.
Examples:
edit 1 -p 91234567 -e johndoe@example.comEdits the phone number and email address of the 1st contact to be91234567andjohndoe@example.comrespectively.edit 2 -n Betsy Crower -tEdits the name of the 2nd contact to beBetsy Crowerand clears all existing tags.edit 3 -aRemoves the address of the 3rd contact.
Locating contacts by criteria: find
Finds contacts in the address book matching the supplied criteria.
Format: find [-n NAME] [-p PHONE_NUMBER] [-e EMAIL] [-a ADDRESS] [-t TAG_CATEGORY TAG_NAME]...
- At least one criterion must be specified.
- Multiple tags can be supplied, but other parameters (name, phone, email, address) may only be specified once.
- Every criterion supplied must match to find a contact.
- Search criteria are case-insensitive. For example,
-n hansmatches-n Hans. - Contacts are matched if the search criterion is a substring of the actual field; for example
-n JohnmatchesJohnandJohnny. - For tag criteria, both a valid category (i.e.
module,facultyorothers) and the tag name must be supplied. - Refer to Tagging a contact for a list of valid tag categories.
Examples:
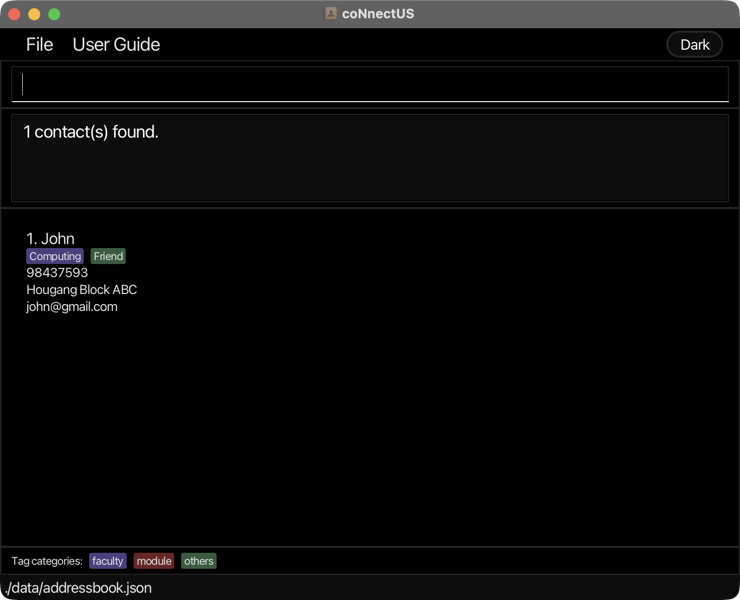
find -n johnreturnsJohn,Johnny.find -e alicereturnsalice@example.com,alicelow@gmail.comfind -p 92returns92005000,88922301find -t others Friend -t faculty Computingreturns contacts who have both tags.
Deleting a contact or multiple contacts: delete
Deletes either the specified contact (based on list index), or removes all instances of the specified tags and deletes contacts with no remaining tags.
Format: delete INDEX | delete -t TAG_CATEGORY TAG_NAME...
Index-based deletion:
- Deletes the contact at the specified
INDEX. - The index refers to the index number shown in the displayed contact list.
- The index must be a positive integer 1, 2, 3, ...
Tag-based deletion:
- Removes matching tags from each tagged contact. Retains the contact if any tags remain; otherwise, deletes it.
- One or more tags can be specified.
- Matching contacts not displayed in the active filter can still be deleted, or have their tags removed.
- Tag categories and tag names are compared case-insensitively.
Examples:
listfollowed bydelete 2deletes the 2nd contact in the address book.find -n Betsyfollowed bydelete 1deletes the 1st contact in the results of thefindcommand.delete -t faculty Scienceremoves the faculty tagSciencefrom all contacts that have it. Contacts that have only faculty tagScienceoriginally are deleted.delete -t module TJ3000 -t others Badmintonremoves the module tagTJ3000and the others tagBadmintonfrom all contacts that have it. Only contacts that originally had either or both of the following tags, will be deleted.TJ3000tag of the "module" category.Badmintontag of the "others" category.
Pinning and unpinning a contact
Contacts can be pinned to be displayed on top of unpinned contacts, and unpinned to be displayed amongst unpinned contacts.
Format: pin INDEX, unpin INDEX
- Pins the contact at the specified
INDEX. - The index refers to the index number specified in the displayed contact list (either using
findorlist). - Regardless of sort order, a pinned contact will always appear on top of an unpinned contact.
- The index must be a positive integer.
- If using
pin, the contact specified atINDEXmust be an unpinned contact. - If using
unpin, the contact specified atINDEXmust be a pinned contact.
- If using
Examples:
listfollowed bypin 3pins the 3rd contact in the address book.find -n Bobfollowed bypin 5pins the 5th contact in the results of thefindcommand.find -e mary@gmail.comfollowed byunpin 1unpins the 1st contact in the results of thefindcommand.
Sorting contacts
Contacts can be sorted according to some attributes, such as their name.
Format: sort (name | email | phone) (asc | desc)
- Attribute for sorting and sorting order are not case-sensitive (
sort nAmE dEsChas the same effect assort name desc). - The specified sorting order is retained after contacts are added/edited - the sort will be automatically reapplied.
- Currently supported attributes for sorting:
- Name (Ascending =
A-Z, Descending =Z-A). - Email (Ascending =
A-Z, Descending =Z-A). - Phone (Ascending = Smaller numbers first, Descending = Larger numbers first).
- Name (Ascending =
Examples:
sort name descsorts the contacts by their name, in reverse alphabetical order (Z-A).sort phone ascsorts the contacts by their phone number, displaying smaller phone numbers first
Tagging a contact
Tags can be added to a contact through the Edit or the Add commands.
The following tag categories are supported, with each category being assigned a unique color code:
- module
- faculty
- others
Tag categories are not case-sensitive.
add ... -t OTHERS friendhas the same effect asadd ... -t oThErS friend.
A contact can only have a maximum of 5 unique tags.
- A tag is unique if the contact does not have another tag with the same
categoryand case-insensitivetag name - For example:
add ... -t others FrIenD -t others friendadds a contact with only 1 tag, whileadd ... -t others friend -t module friendadds a contact with 2 tags.
Clearing all entries: clear
Clears all entries from the address book.
Format: clear
Undoing a change: undo
Reverses the most recent command that changed your contact list.
Format: undo
- Commands that can be undone:
add,edit,delete,clear,pin,unpin,import,sort. - Other commands, such as
list,find,themeandalias, are skipped.undoreverses the most recent command that changed your contact list.- Using undo after a sort restores the previous sorting criteria, even if the contact list itself was unchanged.
- You can use
undoseveral times in a row to reverse earlier changes one at a time. - After an undo, all contacts are shown, with pinned contacts at the top.
- The undo history is cleared when you close coNnectUS.
Examples:
delete 2followed byundobrings back the deleted contact.pin 1,edit 3 -n John Doe, thenundotwice reverses the edit and then the pin.
Redoing an undone change: redo
Reapplies the most recent change that was reversed by undo.
Format: redo
- You can use
redoseveral times in a row to reapply undone changes one at a time, in the order they were made. - Making a new change after an
undo(e.g.add,editordelete) clears the redo history, so the undone changes can no longer be redone. - Commands that do not change your contact list, such as
listandfind, do not clear the redo history. - After a redo, all contacts are shown, with pinned contacts at the top.
Examples:
delete 2,undo, thenredodeletes the contact again.delete 2,undo,add -n Jane Tan -p 87654321 -e janetan@example.com, thenredoshows an error, because adding Jane Tan cleared the redo history.
Importing contacts: import
Imports contacts from a JSON address book file and merges them into the current address book.
Format: import -f FILE_PATH
FILE_PATHis the path to a JSON address book file.- If
FILE_PATHcontains a word starting with-(e.g.contacts -backup.json), wrap the whole path in double quotes. FILE_PATHmust not contain double quotes other than the surrounding pair.- Contacts with the same phone number or email address as an existing contact are skipped.
- Imported contacts are added to the current address book; existing contacts are not replaced.
- The command displays the number of imported and skipped contacts.
- The imported contacts can be removed using
undo.
Example:
import -f data/exports/contacts.jsonimport -f "data/exports/contacts -backup.json"
Exporting contacts: export
Exports contacts that match the specified criteria to a JSON file.
The exported file is saved in the data/exports folder. The .json file extension is added automatically.
Format: export -f FILENAME [-n NAME] [-p PHONE_NUMBER] [-e EMAIL] [-a ADDRESS] [-t TAG_CATEGORY TAG_NAME]...
FILENAMEmust contain only alphanumeric characters and spaces.FILENAMEmust begin with an alphanumeric character and cannot exceed 100 characters.- Do not include the
.jsonfile extension inFILENAME. - If no filtering criteria is provided, all contacts present in coNnectUS at that point of time are exported by default.
- Multiple criteria can be specified. A contact must match every specified criterion to be included in the export.
- If a file with the same name already exists, it will be overwritten.
- Exporting contacts does not modify the contacts in coNnectUS and cannot be undone.
Examples:
export -f contactsexports all contacts todata/exports/contacts.json.export -f filtered-contacts -n Alice -e example.comexports contacts whose names containAliceand whose email addresses containexample.com.
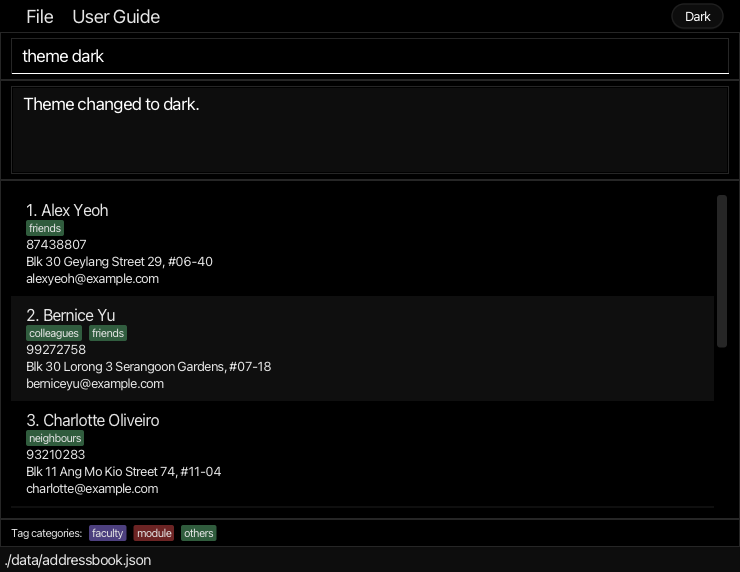
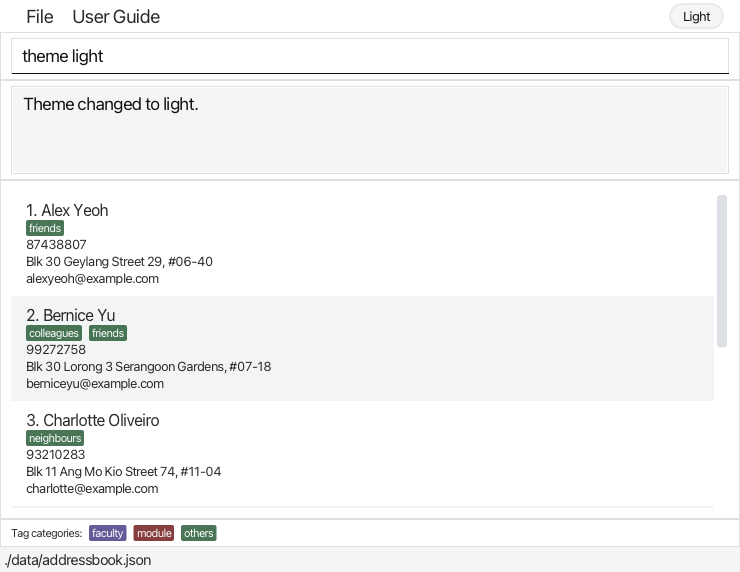
Changing the theme: theme
Switches coNnectUS between a dark theme (true black, which saves power on OLED screens) and a light theme (white).
Format: theme dark | theme light
- The theme name is not case-sensitive. For example,
theme LIGHTworks the same astheme light. - You can also click the Dark / Light button at the right end of the menu bar to switch to the other theme.
- The User Guide window changes to the same theme.
- coNnectUS remembers your theme and opens with it the next time you start the app. The first time you start the app, it opens in the dark theme.
Examples:
theme lightswitches to the light theme.theme darkswitches back to the dark theme.
Adding an alias: alias
Creates an alternative command word for a built-in command, allowing you to customize and use more memorable and intuitive commands.
Format: alias COMMAND_WORD ALIAS_TO_SET
COMMAND_WORDmust be an existing built-in command, written in lowercase, such asfind,addorlist.ALIAS_TO_SETmust contain only English/ASCII lowercase and uppercase letters (a-z,A-Z). Numbers, spaces and special characters are not allowed.There is no maximum length imposed for aliases, giving you the flexibility to choose alias names that suit your needs. For convenience's sake, we recommend choosing an alias that is:
- shorter than the original command such as
forfdforfind; or - easy to associate with the command, such as
searchforfind.
- shorter than the original command such as
Aliases are case-sensitive. For example,
fandFare different aliases and associating each of them with distinct commands is allowed.An alias cannot conflict with an existing built-in command, regardless of letter case. For example, neither
listnorLIST, which exists as a registered command word can be used as an alias.An alias must not already be registered. To reassign an existing alias to a new command word, delete it first using
delete_alias.You can register multiple aliases for the same built-in command.
An alias only replaces the command word. The command word's associated parameter(s) and parameter value(s) are still necessary. E.g.,
alias find f                   # registers "f" as an alias for the "find" command
f -n James -t others friend    # runs the find command with the relevant search criteria
The original command word remains usable after an alias is added.
The list of aliases is viewable using the
list_aliascommand.
Examples:
alias find fallows you to usef -n Jamesinstead offind -n James.alias list lsallows you to uselsinstead oflist.alias delete delallows you to usedel 3instead ofdelete 3.
Alias persistence and undo behaviour
Aliases are saved automatically when you add or remove them and remain available when you restart coNnectUS at data/aliases.json.
Adding or deleting an alias cannot be undone using undo. However, commands executed through an alias follow the same undo behavior as the original command. For example, a deletion of a particular contact performed using del 3 can be undone.
List all available aliases: list_alias
Displays all registered aliases, grouped by corresponding built-in command.
Format: list_alias
- If no aliases have been registered, a message indicating this will be displayed.
Example:
After running
alias find f,alias list landalias list ls, enteringlist_aliasdisplays the following mappings. Their order may vary.Registered alias(es): find: f list: l, ls
Deleting an alias: delete_alias
Removes a registered alias.
Format: delete_alias ALIAS_TO_DELETE
ALIAS_TO_DELETEmust be an existing alias, with the same letter-case used when it was registered.Deleting an alias does not remove its corresponding built-in command or any other aliases corresponding to that command.
To change the command associated with an alias (as shown in the example below), or edit an alias corresponding to a particular command, delete the alias and then re-register it again.
alias edit e        # registers "e" as an alias for the "edit" command
e 1 -n John Cena    # use "e" to rename first contact in the current displayed list
delete_alias e      # removes the alias "e", so that it can be reassigned
alias exit e        # registers "e" as an alias for a different command, "exit"
e                   # exits coNnectUS
Examples:
Assume that the alias f is registered to the built-in command, find.
delete_alias fremoves the aliasf. You can still use the originalfindcommand thereafter.delete_alias ffollowed byalias list freassignsfto thelistcommand.
Transferring aliases to another computer
The alias data file is located at data/aliases.json, relative to coNnectUS's home folder.
To transfer your saved aliases to a new computer:
- Close the coNnectUS application on your old computer.
- On your old computer, open the
datafolder inside your coNnectUS home folder and copyaliases.json. - On your new computer, download coNnectUS and place the JAR file in your preferred folder. This is known as your coNnectUS home folder.
- Create a
datafolder within the home folder and then paste the copiedaliases.jsoninto thedatafolder. - Start coNnectUS on your new computer and enter
list_aliasto verify that your aliases have been transferred successfully.
Replacing existing aliases on the new computer
If data/aliases.json already exists on the new computer, replacing it will overwrite the aliases stored there. Back up the existing file beforehand if you want to keep a copy of those aliases.
Invalid entries in the alias file
If data/aliases.json contains invalid alias entries when coNnectUS starts up, the application skips them and loads the remaining valid alias entries (if any). A startup warning reports the number of loaded and skipped entries.
In this situation, use list_alias to view the aliases that have been loaded and are available for use. Advanced users may correct the entries directly in the alias file while coNnectUS is closed and then restart the application to load the rectified alias entries.
Note that coNnectUS modifies the alias file the next time that you successfully create or delete an alias. Once the relevant entries have been added/removed, the file will only contain valid registered aliases, while the skipped, invalid alias entries will be discarded from the alias file.
In the event that aliases.json itself cannot be loaded, coNnectUS starts without any loaded aliases and displays a warning message.
Exiting the program: exit
Exits the program.
Format: exit
Saving the data
Data is saved automatically by coNnectUS after every successful command that modifies the contact list. You do not need to save manually.
Your window size, window position and theme are saved in [JAR file location]/preferences.json when you close the app.
Editing the data file
The address book application data is saved automatically as a JSON file [JAR file location]/data/addressbook.json. Advanced users are welcome to update data directly by editing that data file.
Caution:
If your changes make the data file invalid, coNnectUS starts with an empty address book at the next run.
The invalid file remains on disk until coNnectUS next saves the address book, including after a successful import that adds no contacts, where coNnectUS will automatically write to the data file.
Still, we recommend backing up the file before editing it.
Furthermore, certain edits can cause the coNnectUS to behave in unexpected ways (e.g., if a value entered is outside the acceptable range). Therefore, edit the data file only if you are confident that you can update it correctly.
FAQ
Q: How do I transfer my data to another computer?
A: Install the app on the other computer and overwrite the data file it creates with the data file from your previous coNnectUS home folder.
Known issues
- When using multiple screens, if you move the application to a secondary screen, and later switch to using only the primary screen, the GUI will open off-screen. The remedy is to delete the
preferences.jsonfile created by the application before running the application again. - If you minimize the User Guide Window and then use the
User Guidemenu, or the keyboard shortcutF1again, the original User Guide Window may remain minimized, and no new User Guide Window will appear. The remedy is to manually restore the minimized User Guide Window.
Command summary
| Action | Format and Examples |
|---|---|
| Add | add -n NAME -p PHONE_NUMBER -e EMAIL [-a ADDRESS] [-t TAG_CATEGORY TAG_NAME]...e.g., add -n James Ho -p 22224444 -e jamesho@example.com -a 123, Clementi Rd, 1234665 -t others friend -t others colleague |
| Clear | clear |
| Delete | delete INDEX | delete -t TAG_CATEGORY TAG_NAME...e.g., delete 3, delete -t faculty CDE |
| Edit | edit INDEX [-n NAME] [-p PHONE_NUMBER] [-e EMAIL] [-a ADDRESS] [-t TAG_CATEGORY TAG_NAME]...e.g., edit 2 -n James Lee -e jameslee@example.com |
| Find | find [-n NAME] [-p PHONE_NUMBER] [-e EMAIL] [-a ADDRESS] [-t TAG_CATEGORY TAG_NAME]...e.g., find -n James -p 2222 -t others friend |
| Pin | pin INDEX |
| Unpin | unpin INDEX |
| List all contacts | list |
| Sort | sort (name | email | phone) (asc | desc) |
| Theme | theme dark | theme light |
| Undo | undo |
| Redo | redo |
| Import | import -f FILE_PATHe.g., import -f data/exports/contacts.json |
| Export | export -f FILENAME [-n NAME] [-p PHONE_NUMBER] [-e EMAIL] [-a ADDRESS] [-t TAG_CATEGORY TAG_NAME]...e.g., export -f contacts -n Alice |
| Add an alias | alias COMMAND_WORD ALIAS_TO_SETe.g., alias find f |
| List all available aliases | list_alias |
| Delete an alias | delete_alias ALIAS_TO_DELETEe.g., delete_alias f |
| Help | help |